Showing posts with label Magic Tiles. Show all posts

Sunday, October 23, 2022

Something for Everyone!

 It might have taken me almost a month to post an update but, Gentle Readers, I hope you'll find it worth the wait!

For a change, let's start with my progress on the work for Art in the Park 2022 -- which is to tour B.C., starting at the Revelstoke Visual Arts Centre, in 2023.

You might recall from my last post that I'd made several unsuccessful samples for ideas I'd had re: a "meadow" piece, and had finally returned to my passion for improv and "artful log cabins" in the style of Katie Pasquini Masopust.  Now that piece is finished but for trimming, facing and attaching a hanging sleeve:


As a reminder, here's the inspirational photo:


Next up, another "flora" inspiration: a plant called "False Hellebore" that grew in profusion in the area, but though pretty, is poisonous.  Here are some photos I took in situ:


Don't those leaves look luscious?!

I had a vision of something 3-D.  Along came a wonderful episode of The Quilt Show featuring artist Mary McCauley, who (by happenstance) makes pieces that resemble "pop-up" books.  Who knew?!  The show got me excited, so I bought her book -- in PDF format because the CAD exchange is out of this world.  At least this way I avoided shipping and printed off only essential pages.

I then tried samples in paper, using recycled file folders as Mary recommends:

Sample 1

Sample 1 - closed

Et voila!  Sample 1 opened

Sample 2 closed

Sample 2 opened


Ah well...neither of these would give me the look I wanted: 3 sculpted leaves meeting around a centre base, like the ones in the photos.  Sigh.

Then I did a bit of internet snooping and found a product that would enable me to mold leaves in the way I wanted -- and maybe this would also enable me to hand-stitch them onto a corded base.  And it's fusible!  Hmmm.   The product is "Inn-spire-Heat Set Moldable Non-woven Interfacing" and -- joy of joys!! -- I could get it in CANADA -- from a shop in Winnipeg, Manitoba: KTR Sewing Centre.  Who knew?!  There's a YouTube video on how to use it.  I ordered two sheets -- despite the flat rate shipping which was almost equal to their cost -- and lo and behold!  Because the actual shipping was significantly less expensive, this wonderful shop refunded me the difference!!  It arrived last week; I've  yet to return to sampling...so stay tuned!

Meanwhile...I moved on to a third piece, from the "forest" inspirational photos -- a section of fallen log:


This one is going to be full of texture.  I began with a simply wonderful commercially-produced background fabric, which I quilted with straight lines.  Next, I painted some used dryer sheets (courtesy of my daughter and one of her friends), and applied them to the surface with hand-stitch, using #12 perle cotton.  


Next I put the piece in a Q-snap frame and began to free-hand embroider the surface with straight stitches, seed stitches, sloppy French knots etc., starting at the top:


I decided to move slowly down the piece, applying all the surface embellishment in one section before moving on to the next.  To this end, I auditioned (and have now begun to add) some seed beads:


Because the fabric isn't easy to stitch through (2-3 layers depending on how I work it out, using threads of varying thickness), it's going to take me some time, but I think it will be well worth it in the end!  Stay tuned for more progress!

Now...what about the other stuff on which I've been working?!

Well...there's all the cross-stitching, mainly for Xmas gifts -- progress on several fronts, some of which I can't share here as the recipient(s) read my blog:


It's been sitting idle since just before Canadian Thanksgiving, because I've also been working on this:


For a young woman who I'm told likes to bake -- this is one of a series called the "Kitchen Counter" series from Hands On Designs.  The full caption will read, "Life is short; lick the bowl".  Great fun!  (I'm using my choice of DMC floss from my stash, plus a 30-count "mystery evenweave", also from stash.
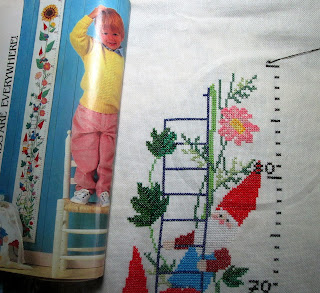
And this week was -- once again -- a visit with the gnomes on the "Growth Chart" project.

In my last post it was here -- approaching the "90" mark:


As of late last evening (October 22), it was here:


Yes, I'm working on flowers and leaves, just past the "100" mark.  Coming along nicely!

Meanwhile, the other wee project for the baby who's going to be given the Growth Chart, was a promised pair (or 2) of socks as the weather grew colder.  These are now finished but to sew in the ends and wash them -- and they'll be mailed off this week:


Last but not least, one more Xmas/birthday gift has been in progress: a throw quilt for a young man of my acquiantance. The top is finished except for the addition of a border to make it a bit larger -- but still within my ability to quilt it here at home.  

The pattern is "Magic Tiles" but, true to form, I messed up the slicing and dicing a bit, so I'm calling it "Wabi Sabi" instead! 😉😆


No matter; it's going to be a cozy covering for TV watching, movie watching, reading, game-playing etc., and I hope it gets well-used!

My theology class is almost over, much to my relief, and I won't be taking another till the new year -- a good thing, because I have too much to do between now and then!

I'll leave you with my usual link to Nina-Marie's Off the Wall Friday.  She's busy this week so is "just hosting" -- but there are lots of blogs to look at, and be inspired.  Happy end of October -- and if your in the Northern Hemisphere, get ready to hunker down and stay cozy!

'Bye for now!


Monday, September 21, 2015

Edging into Autumn

September is slipping through my fingers.  It's almost Autumn...which this year officially begins on Wednesday.

Autumn...one of my favourite times of year despite the shortening days.  The air is crisp and fresh and some of the best trail runs take place because of the cooler weather.

My tomatoes are all in -- green ones in a newsprint-lined container for ripening.  My roses continue to astound me, as do the cosmos, so I'm leaving them alone for the time being.  And I still have to mow the grass at least one more time.  On the shopping list: spring bulbs, which I'll plant now with high hopes they will grace my south flower bed eight months (or so) from now.

It's a bit too cool to sit outside stitching so I'm back in the sewdio, working first on my "Lost Edges" piece.  I blocked it out on Friday using my usual technique of a foundation fabric (unbleached muslin) and lots of pins!  I wasn't about to risk fusing anything in place till I heard from EB!

While I like the piece, I was concerned it lacked a certain "spark"...

Materials: sky - indigo-dyed silk;
hills/"shrubs": assorted synthetic sheers;
background grass: "Fossil Fern", a classic
commercial cotton; foreground
grass: acid-dyed silk;
tree trunks: eco-printed fabric by arlee barr.

Detail 1

Detail 2

And here was EB's response:

I think you've done a very good job of contrasting the edges...and great fabric choices...I don't think you lack very much actually.  Perhaps some debris around the base of the trunks to "tie" them to the ground so they don't look as if they're superimposed...go back out to the area ...or ck your photo to see how the bases of trees  dovetail beautifully into the ground.  You want it to look as if these trees are just growing right up.  You might want to move the LH hand group a little to the left...allowing a view point through the gap...

I think the piece has plenty of pizzaz with that perfect mould (or whatever it was!) dyed fabric... and I love the way you have it going soft and softer...as it goes back.
don't think you need leaves...but maybe a couple of branches to tie the sides of the image to the frame....looks like a great place to go for a walk!
I grinned when I read "Perhaps some debris around the base of the trunks", because of course that will come with the stitching.  And arlee's fabric is printed with leaves...not mould! (grin) but yes, she still makes the best tree trunk fabric I've found!

So this morning I sandwiched the background, as I need to quilt it down (especially the sky) before I apply those trees...It will likely finish around 18" W by 14" L.


And what of the wrapped trees?  Just over two months in, this is how they looked on September 13:

Tree 1 - stains beginning

Tree 2 - staining too

Tree 3 - I'm wondering if'
these stains will last.

Tree 4 - least stained of all,
and I thought it was muslin!

The Christmas knitting is about to begin...as is the production of new minis for two shops, and one for a Christmas commission.

Speaking of commissions...My DD reported that her friends like the Maritime Memories pair...and this morning I picked up the medallion quilt from Sylvia Sawyer, long-arm quilter extraordinaire... Here's just a glimpse of some of the work she did...

Part of centre medallion, zinger, piano key border
Section of outer-most border (untrimmed backing on the right)
Part of inner border, zinger, piano key border

DD will select the binding fabric in a couple of weeks (Thanksgiving) and I'll bring it home to bind and wash before it goes back to her to wrap and give away.

I'm finding this balance of bed quilts and artwork healthy.  I find it satisfying to always have some of each on the go.  The bed quilt construction is rhythmic and methodical (for the most part); the artwork stretches my brain till it groans with that mix of pleasure and pain that is, I think, common to most artists.

This afternoon, I'm piecing the border for the Magic Tiles quilt I began a couple of weeks ago:

Pin carefully because this is sashed at an angle

You want the edges to be even in the end...

Linking this up belatedly to Nina Marie's Off the Wall Friday...hoping you have a creative week and a happy change of seasons.

Till next time...


Wednesday, September 09, 2015

It's a Process...

Over the Labour Day weekend I met a relatively new quilter.  J accompanied her husband, G, when they dropped in to visit on their way up the highway to Bashaw to stay with friends.  I hadn't seen G in over 46 years...so it was a great time of catching up, but also learning what each of us was up to now...and J was most interested in my quilting.  :-)  She confided that though she'd been quilting for a few years -- yet another one of us 'hooked' by a friend -- she liked using kits because then she didn't have to think about colour choices...and, she confessed, she was rather intimidated by her rotary cutter!

She wouldn't be the first one!

Years ago when I started to quilt, I was intimidated by it too.  So...I took a class.  It was at My Sewing Room in Calgary  (in their original location on Elbow Drive S.W.), and the featured pattern was Magic Tiles, created by Kathleen Bissett.  It's all straight-line cutting and piecing, and once you've spent the day (or weekend) making one of these, I guarantee you'll feel comfortable with your rotary cutter!

As it happened, when J visited, I had one of these on the go for a friend of mine -- a Red Hatter -- who's in a tough time right now.

So J, this process is for you...

First, you read through the instructions.  No surprises!

Cut yourself a number of 15" squares in assorted fabrics. I was using a collection of Red Hat-themed fabric I'd gathered over the years.  The pattern calls for 12, but I had only 9 that I thought worked well together, so this is a smaller quilt -- a 'throw' really -- an will finish a little over 50" in each direction.

Lengths of "grout"
For this pattern it is essential that you number each 15" square with a wee square of freezer paper, as you have to cut and shift and re-assemble the blocks in a certain numerical order.

In addition to the squares, you need to cut a good number of 1" strips of "grout" (sashing) using a solid or low-value print that will set off the blocks.


Then you prepare your Magic Tiles cutting guide, using freezer paper:


I couldn't find my white freezer paper so used brown for this project and I confess...I like the white better!  It's lighter, and doesn't curl as much when you're trying to work with it.  Of course, I found the box of white after I had all the blocks assembled!

Following the directions, lay your guide on your first square and cut.  You end up with two sections per square: one section with a number, and a smaller section without.  You sew strips of grout to the smaller sections and then re-assemble the sections... having first 'shifted' the fabrics...

Shift #1...

Re-assembling the sections
You continue to cut the squares using the guide, to shift the sections according to the pattern, and to re-assemble them with strips of 'grout'...until you have a set of fully re-assembled squares!  Note that if you use 12 squares and follow the shifts according to the pattern, you'll end up with one bit of each fabric in each finished block.  However, with 9 fabrics, you'll end up with some duplication instead (I've done this size twice and it's happened both times.  I'd have to do the math to figure it out for 9 blocks and I can't be bothered!)

As the squares develop, it's useful to pin the grout to ensure the sections don't wobble:

Yes, sometimes I like to pin!

Here's a view of the centre of the top hanging on my design wall:


I say "centre" because I am going to surround it with a pieced border...

Strips cut for pieced border

I've decided to make the top and bottom borders a bit deeper than the side borders, so the quilt will end up as a rectangle.  And...I may add a solid outer border if time and fabric permits...

While I was beavering away at this project, my mind was turning over and over the September Theme for EB's Master Class: "Lost Edges".  In between cutting and piecing I did quite a bit of thinking and researching (lost/found edges are used in paintings and drawings)...and this morning I sent EB my watercolour sketch...


Based on this photo (but without all the details re: the trees...just for now)...


And while I await her feedback, I'm linking to WIP Wednesday on The Needle and Thread Network.

'Bye for now!


Sunday, November 09, 2014

First Snow of the Year

Not counting the freak snow storm in Calgary in September, this weekend we've seen the First Snow...the one that has not only arrived, but also is ongoing as I type and is fixing to stay around.

I've decided that even if the winter ahead is as long and cold and snowy as the winter of 2013-2014, this time 'round I'm not going to let it get the best of me!

This year, I'm ready.  I've several coping methods up my sleeve(s); to wit --

  1. Lots to do in the sewdio -- Christmas knitting, my 15 x 15 challenge(s), some major family-and-friend commissions, and the chance I'll get to be one of the new students in Elizabeth Barton's Master Class.
  2. My second year as a SAQA Western Canada Co-Rep, with the objective of learning how to host an online webinar/conference sometime in March.
  3. And last but not least...

The Ideal Single Female Home-owner's Winter Work-out.


Optimum Conditions for the ISFHWW:  
  • Light, steady snow;
  • Little or no breeze;
  • Moderate winter temps -- -10 to -15 C at the coldest and little or no wind chill;
  • A layer of at least 6" of the white stuff, preferably powder.
  • Not just a deck or sidewalk that needs clearing, but also a driveway -- preferably double-wide.
Optimum Equipment for the ISFHWW:

Sturdy, light-weight shovel

Sturdy, warm boots
Warm, wind-proof jacket
Warm pants - even layered with tights
Warm hat - *must* cover ears
Optional: protective eye-wear

Protective gloves/mittens*
*My personal favourite: layering dollar-store gloves under cozy hand-made finger-less ones -- either hand knit or, like these, made from recycled cashmere sweaters.  I bought my pair at a recent "pop-up" market at Latitude 53 in Edmonton...Maker: Lynne Fortowsky of the Sashiko Studio.  Love 'em!

Best of all, when you've spent an hour or so outdoors shovelling, you can come in for a hot cup of Dark Roast...and some cozy stitching...

Shown here: finishing the binding on a Magic Tiles
quilt for baby Kieran James Rennie Ward

P.S.: For Inquiring Minds: these pieces are now finished:

See You in the Spring  (C) 2014

Tipsy Autumn (C) 2014

Five minis will be delivered to Gracie D's tomorrow.  Tell your friends!