Showing posts with label pies. Show all posts

Friday, October 09, 2015

Travelling with Pie

This weekend marks Thanksgiving in Canada, and I'm going up to Edmonton to spend it with my kids, my soon-to-be daughter-in-law and her family.  She and her mom are doing the turkey etc.; I'm bringing pie.

Therein lies the rub: logistics.  I was hoping to assemble two pies in my DD's kitchen, but she's in the midst of a Serious Kitchen Make-over and has no counters!

So.  I made one pie here -- Saskatoon (think 'wild blueberries' if you're not on the Canadian Prairies, Alaska, or the Western/North Central U.S.) -- and froze it.  All well and good.
BUT...the second pie has to be pumpkin (grin) because it's Thanksgiving!  Well.  I've never had experience freezing a pumpkin pie.  Indeed, it's not recommended.

So.  This morning I made the pastry.  I'll freeze it too, and thaw in time to make the pie on Sunday after church.  Bless C's mom, she has a turkey roaster, so The Bird will have its own personal roasting space and I can use the oven for the pie.

In preparation, I've assembled this Travelling Pie Kit:

Ingredients:
Trusty Old Cookbook
Packet of sugar and spices
Can of evaporated milk
Can of unseasoned pumpkin
Bottle of faux vanilla extract
Ball of (frozen) pastry

Tomorrow I'll pack up the Kit and the frozen Saskatoon pie in a box lined with paper and nestled with ice packs...and head out! (I don't own a cooler.  Tried to buy one at the hardware in town yesterday -- they don't make 'em wide enough front-to-back to accommodate a pie plate.)

I have a pit-stop on the way to my DD's home, where I'll be staying.  The stop: a 4-hour class in using InkTense (R) pencils, offered by Central Sewing (South store).  I've muddled along long enough with these -- and with my watercolour pencils -- to know I need some hands-on instruction, so I'm really looking forward to it.

Today?  The forecast is for a high of 20+ C, so it's the perfect day to do the Fall Cleaning of the Car Interior; to check the vents on my roof and 'goop' them if needed; and to maybe do a wee bit of fabric painting -- some skies for my new minis.  

As the 14-day trend is for reasonable temps and mainly sunshine, I'll leave clearing the garden for now.  I hate to put away the Outdoor Studio...especially when I can still stitch there in the sunshine, or use it for photos of finished objects, like this one, which went off in the mail Wednesday...

M's Comfort Shawl
Pattern: "Zilver" by Lisa Mutch
Yarn: Peruvian Pure Alpaca from elann.com (discontinued)

M's Comfort Shawl - close-up

Now...I'm linking this up to Nina Marie's Off the Wall Friday...and will join you there in a break in the action later today!

Happy Thanksgiving to my Canadian readers; I'm thankful to have you all (both Canadians and those who want to be) in my life!


Wednesday, October 02, 2013

Under Construction

There's been a good deal of building going on around here the past couple of days.  It started yesterday, when I had a hankering to get back to work on "Posh Poppies", the pattern and fabric provided me by my long-ago quilting friend, S.

Remember?  S. bought the materials and then panicked when the first instructions she read in the pattern were for painting the background fabric.  I wrote about doing just that, 'way back in mid-August during my Self-directed Summer School (scroll down).

Well.  I'd not only painted the fabric but drew and cut out the templates for the flowers, centres and buds.  I was ready to roll!  Or...so I thought.

Getting into it again yesterday, I discovered the Next Tricky Thing about this pattern: it's not simple applique.  Appearances on the cover of the pattern are deceiving.  It's not fused applique.  It's not even needle-turn applique.  Uh-uh.

It's three-dimensional applique.

That is, the blossoms and buds are all two sided.  I knew the small white flowers were 3-D, because I'd seen a sample wherein they were done in silk ribbon and sewn on.  I'm talking about the poppy flowers themselves.

Even the tips of the leaves are two sided.  The bodies of the leaves and the flower stems are needle-turn, for which I should be grateful, but the blossoms are attached only by the thread painting that decorates them. The buds and stems are two-sided, with the latter being cut on the bias and sewn into tubes that are then turned.   

I tried my hand at a portion of the top poppy (#1 in the pattern), which is constructed by tracing the template -- right-side down -- onto the reverse of the fabric and cutting it out with 1/2" all the way around.  This is then placed, right sides together, on a second piece of the same fabric and they are sewn together on the tracing line using a smaller-than-usual machine stitch (I used 1.5 instead of my machine's default of 2.5 for straight stitching).  The edges are trimmed to 1/4" and you snip deeply into all the corners.  Then you make a 1" slit in the "back" of the flower and turn it carefully right side out.

Oy vey.

I learned the following from my first attempt:

  • Trim the seams to less than 1/4: if you can but be careful when you're poking the edges out with your turning device (I use a "Purple Thang");
  • Clip all curved edges;
  • Use red thread in top and bobbin; any other colour will show through the seams.
  • I can't tell which is considered the "back" of the flower because it's already been reversed twice (template 'wrong-side' down on the 'wrong' side of the fabric.
On my second attempt -- which I postponed till this morning! -- I still got the petal section reversed, but decided it was a flower; it could cope.  Here are two petal sections and the centre of Poppy #1, lying on the painted background, just to get an idea of what it might look like.  It looks well in the photo but "up close and personal"?  Well...maybe after I add some stitching...

"Posh Poppies" first blossom attempt!
And some people think creating an original design is tough.   Not compared to following Someone Else's Instructions! LOL!

While I was in the mood for SEI, I made the October block for the "Cinnamon" Block of the Month series I've been doing since January -- designed to finish a top from the first of three BOMs I bought years ago at the now-retired Freckles Quilt Shoppe in Calgary.

"Chicago Pavements"

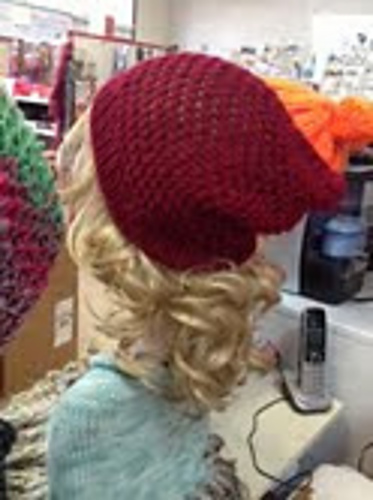
In addition to this 'finish', there was one in the knitting department -- a second hat that had been commissioned by a non-knitting customer at the shop.  It's now washed and has been laid flat to dry.  It looks rather nondescript right now:

Swirly Slouch Hat - (C) Lori Nowochin, 2013

But here's how the first one looked on a mannequin in the shop:


And last but not least...

Our parish's Annual Fall Dinner is tomorrow night, and as usual, I've made a couple of pies.  This year I had more rhubarb than anything else, so I made these Rhubarb Crumble pies this morning:


Sorry if the photo makes you a bit queasy; I'd rotated it in my photo program, but clearly something got lost in translation to cyberspace!!

Linking up to WIP Wednesday on The Needle and Thread Network before I head out for a jog, now that the rain has stopped.

What are you building today?